In FuseDesk you can create interactive checklists when adding a note to a case.
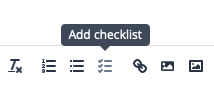
While adding a note to a case, simply click the Add Checklist icon. This will create your first unchecked item ready for text.
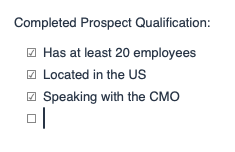
You can add as many checklist items as you like and pre-check any off that have already been completed.
After a note is saved, it gets added to your case history like always, except now you have an interactive checklist!
You and your colleagues can now check and uncheck items on notes in your case history!
As items get marked complete or incomplete, a case history log entry gets created documenting who completed an item and when.
Ideas for Checklists
Where might you use checklists in FuseDesk?
Use a checklist on a note to:
- Document the steps completed in a sales call
- Qualify a lead or a prospect on a phone call
- Keep track of important onboarding steps for a new customer case
- Create a document checklist for a work order
Checklists in Note Templates
These checklists can also be added to note templates for easy reuse by your team.
Adding checklists to your note templates empowers your team to use the same process or list every time that they use the note template.
Repeatable, documented processes that your team follows consistently provide a better customer experience.
Using a Checklist in your Workflows
By adding a checklist to notes in your cases, you can assure that certain steps are performed when a case is in a certain workflow step.
For example in a sales pipeline workflow, you can have one note template for your prospect qualification steps, and then another for the sales/quoting process, and finally another checklist for your onboarding steps.