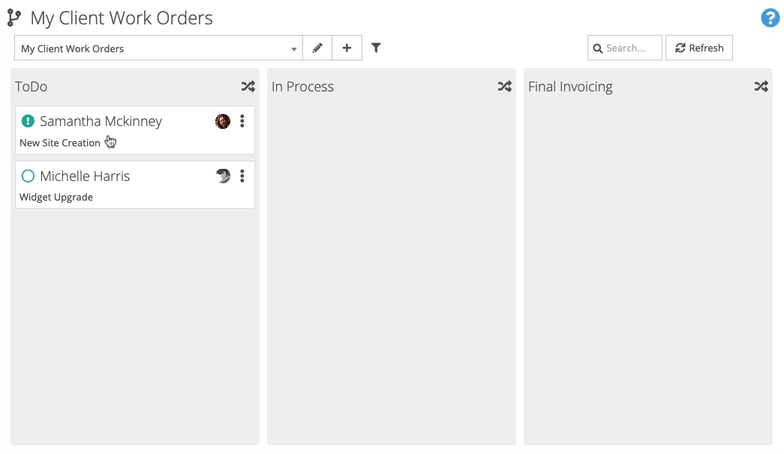
When viewing cases in a Workflow the two main actions you’ll be taking are moving cases between columns and viewing an individual case.
Selecting, Editing, and Creating Workflows
The first thing you’ll do in the Workflow view is to select which Workflow you’d like to use from the menu up top.
If you have permission to edit the selected workflow, you’ll have an Edit icon next to the workflow. Click the edit icon to edit your workflows.
Click the Plus button to create a new Workflow.
Workflow Filters
If the workflow you selected is filtering cases, you’ll see a filter icon.
Hover over that icon to see what filters are currently being applied to this view.
Searching Cases
Just like in case queues, you can quickly find the case you’re looking for by using the quick search at the top of the workflow. Enter text to search for in the box and cases will be filtered to just cases matching that text.
Case Colors and Icons
Each case in a workflow has a colored status icon. Like in case queues, the color indicates how long it’s been since a case was last responded to by email or phone.
Green cases were responded to recently.
Yellow cases have not been responded to recently.
Red cases have not had a response in too long.
Case statuses are indicated by the icon and can be one of New, Open, Snoozed, or Closed.
Hover over the colored status icon for the case status and relevant dates.
Moving Cases in a FuseDesk Workflow
To move a case between columns, simply click a drag the case.
If you have Unassigned Emails enabled in your Workflow, you can also drag an Unassigned email into a column to assign it.
Selecting Multiple Cases
To select a range of cases in a column, hold down the SHIFT key and click between two cases to select both cases and all cases in between.
To select a group of individual cases in a column, Ctrl (or ⌘ on OS X) Click individual cases.
To move multiple cases, simply drag and drop them all between two columns.
Case Actions
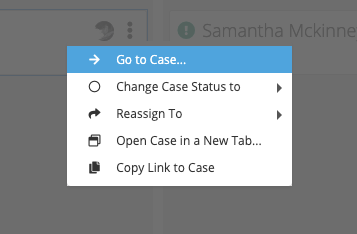
You can easily reassign or transfer cases, change the status of a case, and more simply by right clicking (Ctrl-Clicking on OS X) on a case or a group of cases.
From the Case Action Menu that opens up, you can choose to Change Case Status or Reassign.
You can also choose to Go to Case to view the case you clicked on, Open Case in a New Tab, to open the case you clicked on in a new tab, or Copy Link to Case to copy a link to your clipboard directly to the case you clicked.
Viewing a Case
To view a specific case, simply double click it or choose Go to Case from the Case Action Menu.
Workflow Automations
At the top of each Workflow Column, you may see an Automation icon.
Hover over the Automation icon to see what Automations may run as you move cases between columns.
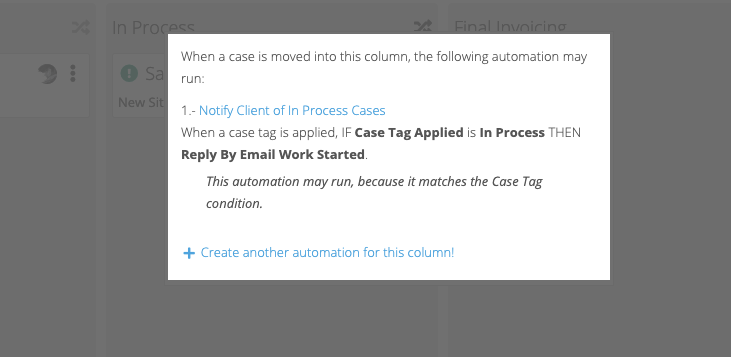
If you have permission to create new Automations, you will also have a link to create a new Automation for when a case is moved into the column selected.