You can create cases in FuseDesk directly from within Keap’s Campaign Builder.
To do so you will first need to create an API key in FuseDesk.
You can create your API key following these steps:
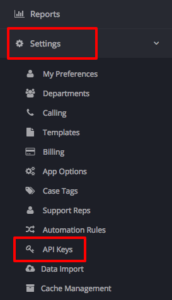
- In FuseDesk, go to Settings -> API Keys.
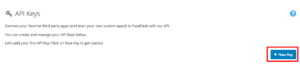
- Click + New Key.
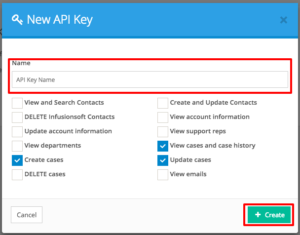
- In the window that will open give your API Key a Name, select the Case Permissions and click + Create.
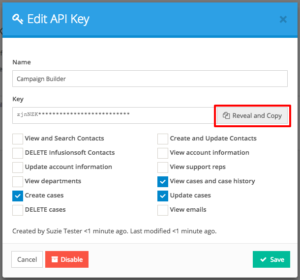
- Click Reveal & Copy to copy the API Key.
- Now go to Keap’s Campaign Builder and go into the Sequence where you want to create the case.
- From under Process, connect up a new Send HTTP Post.
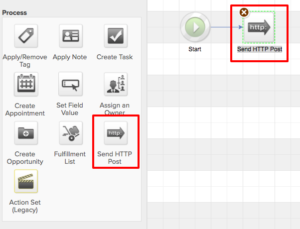
- Double click the newly placed HTTP Post to edit it
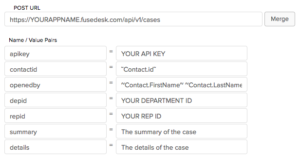
- For Post URL enter https://YOURAPPNAME.fusedesk.com/api/v1/cases (where YOURAPPNAME is your FuseDesk app name)
- For the Name / Value Pairs, use the following:
- Name:
apikey/ Value: paste the API Key created from FuseDesk above - Name:
contactid/ Value:~Contact.Id~(note the all lower case for the name, and the upper case C and I in the value merge field) - Name:
openedby/ Value:~Contact.FirstName~ ~Contact.LastName~ - Name:
depid/ Value: the ID of the department you want to assign the case to (to get this information, click the respective department’s queue in your FuseDesk application and copy the number that appears at the end of the URL in your address bar). - Name:
repid/ Value: the FuseDesk User ID (or CSV of User IDs) of the representative you want to assign the case to (to get this information, click the respective department’s queue in your FuseDesk application and copy the number that appears at the end of the URL in your address bar). This is optional, so if you would like to pick a random rep in the department just remove this pair. - Name:
summary/ Value: The short title or summary of the case. Use whatever merge fields you like here form Keap. This should be short, like a subject line of an email. - Name:
details/ Value: More details about the case. Use whatever merge fields you like here from Keap. This can have all the case details that you want your team to see.
- Name:
casetags/ Value: The FuseDesk Case Tags (as a CSV) you’d like applied to this new case. You can use the actual tag names, or their FuseDesk IDs. Separate multiple Case Tags with commas. This field is Optional.
- Name:
- Once you finish your HTTP Post should look like this:
- Change the status from Draft to Ready using the toggle in the top right corner.
- Click back to the Sequence and click Publish!